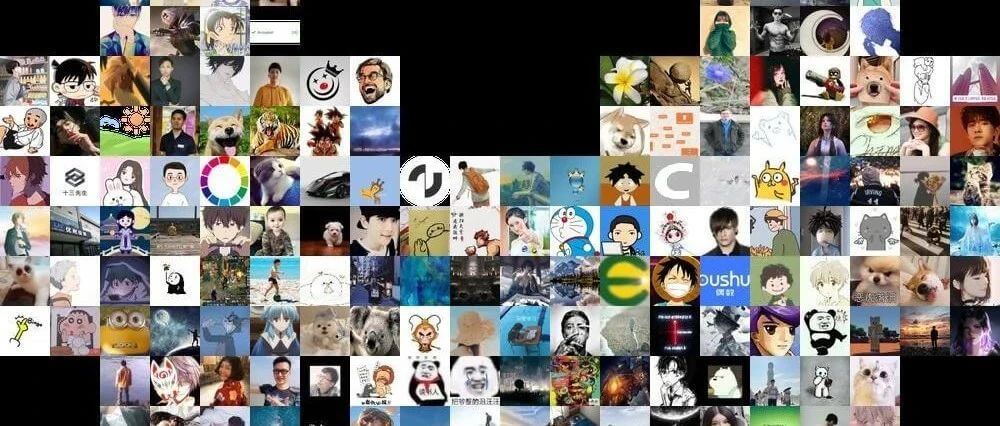
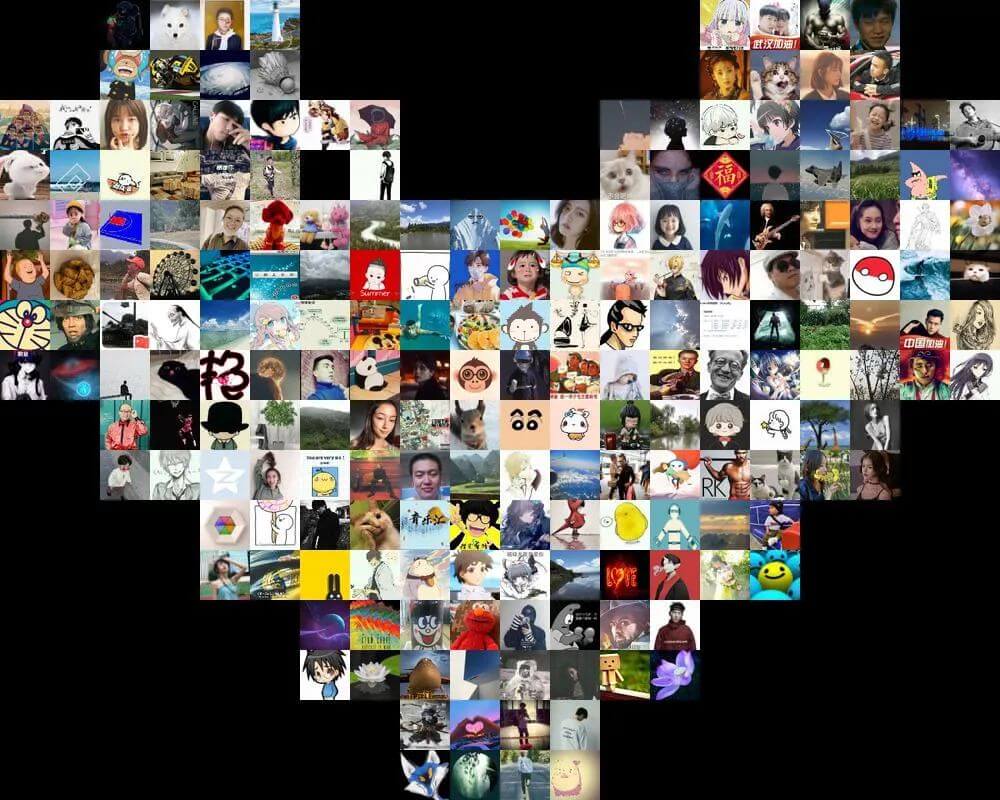
表白神器!使用 Python PIL 库绘制爱心墙!


一、爱心墙

通过爬虫搜集到粉丝的头像,然后利用 PIL 库拼接出爱心墙的形状

二、代码分析

1.头像爬取

在个人中心点击我的粉丝便可以看到自己的粉丝

通过抓包可知对应的接口为:

url = 'https://me.csdn.net/api/relation/index?pageno=1&pagesize=20&relation_type=fans' # 接口地址

那么,可以定义一个函数来获取粉丝的信息:

def get_fansInfo():
    '''
    获取粉丝相关信息
    '''

    url = 'https://me.csdn.net/api/relation/index?pageno=%d&pagesize=%d&relation_type=fans' # 接口地址
    cookies = {} # 用户登陆cookies
    headers = {  # 请求头
        'User-Agent''Mozilla/5.0 (Windows NT 6.3; Win64; x64; rv:81.0) Gecko/20100101 Firefox/81.0',
        'Accept''application/json, text/plain, */*',
        'Accept-Language''zh-CN,zh;q=0.8,zh-TW;q=0.7,zh-HK;q=0.5,en-US;q=0.3,en;q=0.2',
        'Referer''https://i.csdn.net/',
        'Origin''https://i.csdn.net',
        'Connection''keep-alive',
        'TE''Trailers',
    }
    # 获取粉丝总数
    res = requests.get(url%(1,10),headers=headers,cookies=cookies)
    res_json = res.json()
    N_fans = res_json['data']['data_all']
    print('一共有%d个粉丝'%N_fans)
    # 获取全部粉丝数据
    res = requests.get(url%(1,N_fans),headers=headers,cookies=cookies)
    res_json = res.json()
    return res_json

在返回的数据中,包括一个avatar字段,这个就是用户的头像地址

拿到头像地址之后便可以定义个函数来下载相应的头像:

def download_avatar(username,url):
    '''
    下载用户头像
    '''

    savePath = './avatars' # 头像存储目录
    res = requests.get(url)
    with open('%s/%s.jpg'%(savePath,username),'wb'as f:
        f.write(res.content)

定义主函数,运行代码:

if __name__ == '__main__':
    fans = get_fansInfo()
    for f in fans['data']['list']:
        username = f['fans'# 用户名
        url = f['avatar']    # 头像地址
        download_avatar(username,url)
        print('用户"%s"头像下载完成!'%username)

最后我成功将所有头像下载到本地文件夹中:
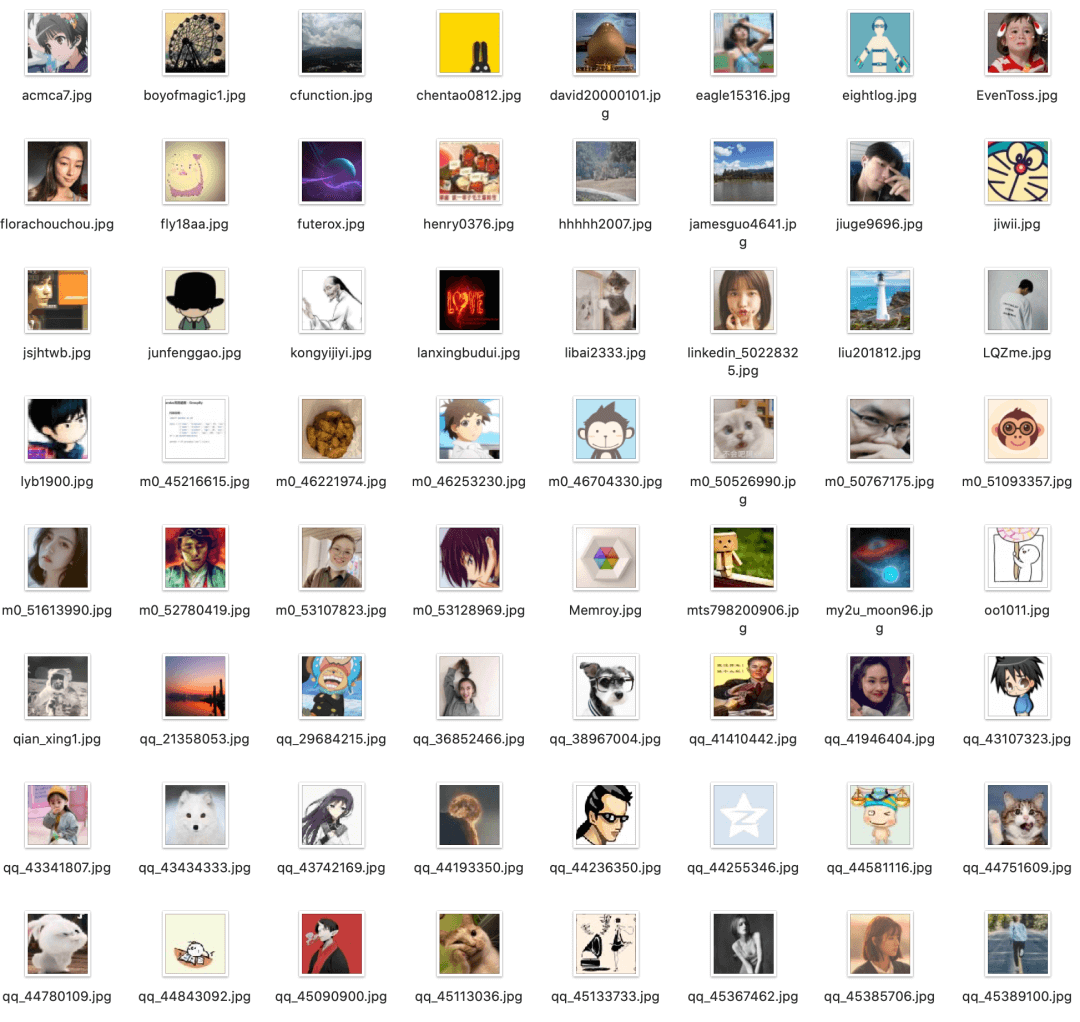
2.头像去重

聪明的你应该已经发现,在爬取到的头像中有两个头像重复出现(想必这应该是官方默认头像):


于是乎,为了更好地展示,我们得对头像进行去重

这里我们利用每个头像的 MD5 值来进行去重,然后定义函数来计算头像的 MD5 值

def get_md5(filename):
    '''
    获取文件的md5值cls
    '''

    m = hashlib.md5()
    with open(filename,'rb'as f:
        for line in f:
            m.update(line)
    md5 = m.hexdigest()
    return md5

说明:每个文件通过 MD5 计算出摘要,理论来说只有文件完全一致 MD5 值才会相同。因此,可以利用它来进行图像的去重

对头像进行去重,并把去重后的头像保存到另外的目录中:

# 照片去重
md5_already = [] # 用于存储已经记录过的图片,便于去重
for filename in os.listdir('./avatars'):
    md5 = get_md5('./avatars/'+filename)  
    if md5 not in md5_already:
        md5_already.append(md5)
        shutil.copyfile('./avatars/'+filename,'./avatars(dr)/'+filename)

3.绘制爱心墙

这一步,主要是利用 PIL 库来把头像按照设定的框架拼接成一个更大的图片

首先导入相关库:

import os
import random
import numpy as np
import PIL.Image as Image

定义绘制图形的框架(用二维数组表示):

FRAME = [[0,1,1,0,0,0,0,1,1,0],
         [1,1,1,1,0,0,1,1,1,1],
         [1,1,1,1,1,1,1,1,1,1],
         [1,1,1,1,1,1,1,1,1,1],
         [0,1,1,1,1,1,1,1,1,0],
         [0,0,1,1,1,1,1,1,0,0],
         [0,0,0,1,1,1,1,0,0,0],
         [0,0,0,0,1,1,0,0,0,0]]

这里大家完全可以发挥自己的想象,画你心中所想

其中,0 表示不进行填充,1 表示用头像进行填充。

定义相关参数,包括每张用于填充的头像的大小、每个点位填充的次数等

# 定义相关参数
SIZE = 50 # 每张图片的尺寸为50*50
N = 2     # 每个点位上放置2*2张图片

# 计算相关参数
width = np.shape(FRAME)[1]*N*SIZE  # 照片墙宽度
height = np.shape(FRAME)[0]*N*SIZE # 照片墙高度
n_img = np.sum(FRAME)*(N**2)       # 照片墙需要的照片数
filenames = random.sample(os.listdir('./avatars(dr)'),n_img) # 随机选取n_img张照片
filenames = ['./avatars(dr)/'+f for f in filenames]

遍历 FRAME,用头像对背景图片进行填充:

# 绘制爱心墙
img_bg = Image.new('RGB',(width,height)) # 设置照片墙背景
i = 0
for y in range(np.shape(FRAME)[0]):
    for x in range(np.shape(FRAME)[1]):
         if FRAME[y][x] == 1# 如果需要填充
             pos_x = x*N*SIZE # 填充起始X坐标位置
             pos_y = y*N*SIZE # 填充起始Y坐标位置
             for yy in range(N):
                 for xx in range(N):
                     img = Image.open(filenames[i])
                     img = img.resize((SIZE,SIZE),Image.ANTIALIAS)
                     img_bg.paste(img,(pos_x+xx*SIZE,pos_y+yy*SIZE))
                     i += 1
                
# 保存图片
img_bg.save('love.jpg')

写在最后

天气逐渐微寒,愿这次小小的表白可以给你们带来些许暖意;愿风雨兼程,不忘归途;愿身能似月亭亭,千里伴君行!

转自AirPython.

我们的文章到此就结束啦,如果你喜欢今天的 Python 教程,请持续关注Python实用宝典。

有任何问题,可以在公众号后台回复:加群,回答相应验证信息,进入互助群询问。

原创不易,希望你能在下面点个赞和在看支持我继续创作,谢谢!

给作者打赏,选择打赏金额
¥1¥5¥10¥20¥50¥100¥200 自定义

​Python实用宝典 ( pythondict.com )
不只是一个宝典
欢迎关注公众号:Python实用宝典

漂亮的GitHub个人总览 ,原来这么容易实现

前段时间,GitHub悄悄地发布了一个新功能:Profile README.

翻译成中文即简历型README,好听一点就是个人自述型简历,简单点就是个人GitHub总览

下面给大家讲讲怎么通过 GitHub API 创建一个能够自更新的总览。

1.首先,创建一个GitHub仓库:

创建一个与你的GitHub帐户同名的存储库(在我的情况下为github.com/Ckend/Ckend

向其添加一个README.md,我写入了以下内容:

“To be continued…”

如图所示:

然后GitHub将在你的个人资料页面顶部呈现该README内容,对我来说就是github.com/Ckend

如图所示,你用户名的这个仓库的 README.md 将成为你的个人资料首页的展示内容。

2.美化你的展示内容

首先,我们可以加一个GitHub的基本统计信息

这是官方给出的统计组件API,使用起来很方便,你只需要往你的README.md里添加下述代码即可:

<img align="left" src="https://github-readme-stats.vercel.app/api?username=你的账号用户名&include_all_commits=true&count_private-true&custom_title=你的账号用户名'%20GitHub%20Stats&line_height=30&show_icons=true&hide_border=true&bg_color=192133&title_color=efb752&icon_color=efb752&text_color=70bed9">

此外GitHub官方还提供了一个展示自己最常用语言的接口。

你可以在README.md里添加下述内容展示这个图表:

<img align="right" src="https://github-readme-stats.vercel.app/api/top-langs/?username=ckend">

你还可以带一个 &layout=compact 参数展示横版图表:

<img align="right" src="https://github-readme-stats.vercel.app/api/top-langs/?username=ckend&layout=compact">

另外,​我们还可以加上技术栈图标:

利用 https://img.shields.io 提供的图标,可以轻松实现这点,在README键入以下内容即可:

### 技术栈

![Python](https://img.shields.io/badge/-Python-192133?style=flat-square&logo=python&logoColor=white)
![Django](https://img.shields.io/badge/-Django-192133?style=flat-square&logo=figma&logoColor=white)
![PHP](https://img.shields.io/badge/-PHP-192133?style=flat-square&logo=figma&logoColor=white)
![MySQL](https://img.shields.io/badge/-MySQL-192133?style=flat-square&logo=mysql&logoColor=white)
![Redis](https://img.shields.io/badge/-Redis-192133?style=flat-square&logo=redis&logoColor=white)
![Elasticsearch](https://img.shields.io/badge/-Elasticsearch-192133?style=flat-square&logo=elasticsearch&logoColor=white)
![Kafka](https://img.shields.io/badge/-Kafka-192133?style=flat-square&logo=apache-kafka&logoColor=white)

当然,你要根据自己的情况做修改。

此外,shields网站还能自定义图标,可以用于展示自己的项目:

### 项目
[![pythondict-quant](https://img.shields.io/badge/pythondict-quant-192133?style=flat-square)](https://github.com/Ckend/pythondict-quant)
[![scihub-cn](https://img.shields.io/badge/scihub-cn-192133?style=flat-square)](https://github.com/Ckend/scihub-cn)

你可以按照自己的情况选择以上任意一种组件来美化总览。

完成一个漂亮的总览,能让你更有动力去维护GitHub仓库,所以一定要动手试试。

下面给大家提供一份我的总览完整版:

<img align="left" src="https://github-readme-stats.vercel.app/api?username=Ckend&include_all_commits=true&count_private-true&custom_title=Ckend'%20GitHub%20Stats&line_height=30&show_icons=true&hide_border=true&bg_color=192133&title_color=efb752&icon_color=efb752&text_color=70bed9">

### 技术栈
​
![Python](https://img.shields.io/badge/-Python-192133?style=flat-square&logo=python&logoColor=white)
![Django](https://img.shields.io/badge/-Django-192133?style=flat-square&logo=figma&logoColor=white)
![PHP](https://img.shields.io/badge/-PHP-192133?style=flat-square&logo=figma&logoColor=white)
![MySQL](https://img.shields.io/badge/-MySQL-192133?style=flat-square&logo=mysql&logoColor=white)
![Redis](https://img.shields.io/badge/-Redis-192133?style=flat-square&logo=redis&logoColor=white)
![Elasticsearch](https://img.shields.io/badge/-Elasticsearch-192133?style=flat-square&logo=elasticsearch&logoColor=white)
![Kafka](https://img.shields.io/badge/-Kafka-192133?style=flat-square&logo=apache-kafka&logoColor=white)

### 项目
[![pythondict-quant](https://img.shields.io/badge/pythondict-quant-192133?style=flat-square)](https://github.com/Ckend/pythondict-quant)
[![scihub-cn](https://img.shields.io/badge/scihub-cn-192133?style=flat-square)](https://github.com/Ckend/scihub-cn)

大家可以参考这个方案进行修改,绘制一个属于自己的漂亮总览。

我们的文章到此就结束啦,如果你喜欢今天的 Python 教程,请持续关注Python实用宝典。

有任何问题,可以在公众号后台回复:加群,回答相应验证信息,进入互助群询问。

原创不易,希望你能在下面点个赞和在看支持我继续创作,谢谢!

给作者打赏,选择打赏金额
¥1¥5¥10¥20¥50¥100¥200 自定义

​Python实用宝典 ( pythondict.com )
不只是一个宝典
欢迎关注公众号:Python实用宝典