问题:访问像属性一样的字典键?
我发现访问dict键obj.foo而不是更为方便obj['foo'],因此我编写了以下代码段:
class AttributeDict(dict):
    def __getattr__(self, attr):
        return self[attr]
    def __setattr__(self, attr, value):
        self[attr] = value
但是,我认为一定有某些原因导致Python无法立即提供此功能。以这种方式访问字典键的注意事项和陷阱是什么?
I find it more convenient to access dict keys as obj.foo instead of obj['foo'], so I wrote this snippet:
class AttributeDict(dict):
    def __getattr__(self, attr):
        return self[attr]
    def __setattr__(self, attr, value):
        self[attr] = value
However, I assume that there must be some reason that Python doesn’t provide this functionality out of the box. What would be the caveats and pitfalls of accessing dict keys in this manner?
回答 0
最好的方法是:
class AttrDict(dict):
    def __init__(self, *args, **kwargs):
        super(AttrDict, self).__init__(*args, **kwargs)
        self.__dict__ = self
一些优点:
- 它实际上有效!
- 没有字典类方法被遮盖(例如,
.keys()工作就很好。除非-当然-您为其分配了一些值,请参见下文)
- 属性和项目始终保持同步
- 尝试访问不存在的键作为属性正确引发,
AttributeError而不是KeyError
缺点:
- 如果这样的方法被传入的数据覆盖,它们
.keys()将无法正常工作
- 在Python <2.7.4 / Python3 <3.2.3中导致内存泄漏
- 皮林特(Pylint)
E1123(unexpected-keyword-arg)和E1103(maybe-no-member)
- 对于初学者来说,这似乎是纯魔术。
简短说明
- 所有python对象在内部将其属性存储在名为的字典中
__dict__。
- 不需要内部字典
__dict__必须是“仅是简单的字典”,因此我们可以将dict()内部字典的任何子类分配给它。
- 在我们的例子中,我们只需分配要
AttrDict()实例化的实例(就像在中一样__init__)。
- 通过调用
super()的__init__()方法,我们可以确保它(已经)的行为与字典完全相同,因为该函数将调用所有字典实例化代码。
Python无法立即提供此功能的原因之一
如“ cons”列表中所述,这将存储键的命名空间(可能来自任意和/或不受信任的数据!)与内置dict方法属性的命名空间结合在一起。例如:
d = AttrDict()
d.update({'items':["jacket", "necktie", "trousers"]})
for k, v in d.items():    # TypeError: 'list' object is not callable
    print "Never reached!"
The best way to do this is:
class AttrDict(dict):
    def __init__(self, *args, **kwargs):
        super(AttrDict, self).__init__(*args, **kwargs)
        self.__dict__ = self
Some pros:
- It actually works!
- No dictionary class methods are shadowed (e.g.
.keys() work just fine. Unless – of course – you assign some value to them, see below)
- Attributes and items are always in sync
- Trying to access non-existent key as an attribute correctly raises
AttributeError instead of KeyError
- Supports [Tab] autocompletion (e.g. in jupyter & ipython)
Cons:
- Methods like
.keys() will not work just fine if they get overwritten by incoming data
- Each
AttrDict instance actually stores 2 dictionaries, one inherited and another one in __dict__
- Causes a memory leak in Python < 2.7.4 / Python3 < 3.2.3
- Pylint goes bananas with
E1123(unexpected-keyword-arg) and E1103(maybe-no-member)
- For the uninitiated it seems like pure magic.
A short explanation on how this works
- All python objects internally store their attributes in a dictionary that is named
__dict__.
- There is no requirement that the internal dictionary
__dict__ would need to be “just a plain dict”, so we can assign any subclass of dict() to the internal dictionary.
- In our case we simply assign the
AttrDict() instance we are instantiating (as we are in __init__).
- By calling
super()‘s __init__() method we made sure that it (already) behaves exactly like a dictionary, since that function calls all the dictionary instantiation code.
One reason why Python doesn’t provide this functionality out of the box
As noted in the “cons” list, this combines the namespace of stored keys (which may come from arbitrary and/or untrusted data!) with the namespace of builtin dict method attributes. For example:
d = AttrDict()
d.update({'items':["jacket", "necktie", "trousers"]})
for k, v in d.items():    # TypeError: 'list' object is not callable
    print "Never reached!"
Update – 2020
Since this question was asked almost ten years ago, quite a bit has changed in Python itself since then.
While this approach is still valid for some cases, e.g. legacy projects stuck to older versions of Python and cases where you really need to handle dictionaries with very dynamic string keys – I think that in general the dataclasses introduced in Python 3.7 are the obvious/correct solution to vast majority of the use cases of AttrDict.
回答 1
如果使用数组表示法,则可以将所有合法字符串字符作为键的一部分。例如,obj['!#$%^&*()_']
You can have all legal string characters as part of the key if you use array notation.
For example, obj['!#$%^&*()_']
回答 2
在另一个SO问题中,有一个很好的实现示例,可以简化您的现有代码。怎么样:
class AttributeDict(dict):
    __getattr__ = dict.__getitem__
    __setattr__ = dict.__setitem__
更简洁,不留任何余地额外的克鲁夫特进入你__getattr__和__setattr__功能的未来。
From This other SO question there’s a great implementation example that simplifies your existing code. How about:
class AttributeDict(dict):
    __slots__ = ()
    __getattr__ = dict.__getitem__
    __setattr__ = dict.__setitem__
Much more concise and doesn’t leave any room for extra cruft getting into your __getattr__ and __setattr__ functions in the future.
回答 3
我在哪里回答所问的问题
为什么Python不提供开箱即用的功能?
我怀疑这与Python的Zen有关:“应该有一种-最好只有一种-显而易见的方法。” 这将创建两种显而易见的方式来访问字典中的值:obj['key']和obj.key。
注意事项和陷阱
这些可能包括代码不够清晰和混乱。也就是说,以下内容可能会使以后打算维护您代码的其他人感到困惑,甚至如果您暂时不使用它,也可能会使您感到困惑。再次,来自禅宗:“可读性很重要!”
>>> KEY = 'spam'
>>> d[KEY] = 1
>>> # Several lines of miscellaneous code here...
... assert d.spam == 1
如果d被实例化, KEY被定义或被 d[KEY]分配为远离d.spam使用的地方,则它很容易导致对正在执行的操作感到困惑,因为这不是常用的习惯用法。我知道这可能会使我感到困惑。
另外,如果您KEY按如下方式更改值(但未更改d.spam),则您将获得:
>>> KEY = 'foo'
>>> d[KEY] = 1
>>> # Several lines of miscellaneous code here...
... assert d.spam == 1
Traceback (most recent call last):
  File "<stdin>", line 2, in <module>
AttributeError: 'C' object has no attribute 'spam'
海事组织,不值得付出努力。
其他项目
正如其他人指出的那样,您可以使用任何可哈希对象(不仅仅是字符串)作为dict键。例如,
>>> d = {(2, 3): True,}
>>> assert d[(2, 3)] is True
>>>
是合法的,但是
>>> C = type('C', (object,), {(2, 3): True})
>>> d = C()
>>> assert d.(2, 3) is True
  File "<stdin>", line 1
  d.(2, 3)
    ^
SyntaxError: invalid syntax
>>> getattr(d, (2, 3))
Traceback (most recent call last):
  File "<stdin>", line 1, in <module>
TypeError: getattr(): attribute name must be string
>>>
不是。这使您可以访问字典键的所有可打印字符或其他可哈希对象的范围,而访问对象属性时则没有这些范围。这使诸如缓存对象元类之类的魔术成为可能,例如Python Cookbook(第9章)中的配方。
我在其中编辑
我更喜欢的美学spam.eggs过spam['eggs'](我认为它看起来更清洁),我真的开始渴望这个功能时,我遇到了namedtuple。但是能够执行以下操作的便利性胜过它。
>>> KEYS = 'spam eggs ham'
>>> VALS = [1, 2, 3]
>>> d = {k: v for k, v in zip(KEYS.split(' '), VALS)}
>>> assert d == {'spam': 1, 'eggs': 2, 'ham': 3}
>>>
这是一个简单的示例,但是我经常发现自己在不同情况下使用dict而不是使用obj.key符号(即,当我需要从XML文件读取首选项时)。在其他情况下,出于美学原因,我倾向于实例化动态类并在其上添加一些属性,我将继续使用dict来保持一致性,以增强可读性。
我确信OP早就解决了这个问题,使他满意,但是如果他仍然想要此功能,那么我建议他从pypi下载提供该功能的软件包之一:
束是我更熟悉的一种。的子类dict,因此您具有所有功能。AttrDict看起来也很不错,但是我并不熟悉它,也没有像 Bunch那样详细地浏览源代码。- Addict会得到积极维护,并提供类似attr的访问权限。
- 如Rotareti的评论所述,Bunch已过时,但有一个名为Munch的活动叉子。
但是,为了提高代码的可读性,我强烈建议他不要混合使用自己的符号样式。如果他喜欢这种表示法,那么他应该简单地实例化一个动态对象,为其添加所需的属性,然后将其命名为day:
>>> C = type('C', (object,), {})
>>> d = C()
>>> d.spam = 1
>>> d.eggs = 2
>>> d.ham = 3
>>> assert d.__dict__ == {'spam': 1, 'eggs': 2, 'ham': 3}
我在其中更新,以在评论中回答后续问题
在下面的评论中,Elmo问:
如果您想更深入一点怎么办?(指type(…))
尽管我从未使用过这种用例(再次dict,为了保持一致性,我倾向于使用nested ),但是以下代码可以工作:
>>> C = type('C', (object,), {})
>>> d = C()
>>> for x in 'spam eggs ham'.split():
...     setattr(d, x, C())
...     i = 1
...     for y in 'one two three'.split():
...         setattr(getattr(d, x), y, i)
...         i += 1
...
>>> assert d.spam.__dict__ == {'one': 1, 'two': 2, 'three': 3}
Wherein I Answer the Question That Was Asked
Why doesn’t Python offer it out of the box?
I suspect that it has to do with the Zen of Python: “There should be one — and preferably only one — obvious way to do it.” This would create two obvious ways to access values from dictionaries: obj['key'] and obj.key.
Caveats and Pitfalls
These include possible lack of clarity and confusion in the code. i.e., the following could be confusing to someone else who is going in to maintain your code at a later date, or even to you, if you’re not going back into it for awhile. Again, from Zen: “Readability counts!”
>>> KEY = 'spam'
>>> d[KEY] = 1
>>> # Several lines of miscellaneous code here...
... assert d.spam == 1
If d is instantiated or KEY is defined or d[KEY] is assigned far away from where d.spam is being used, it can easily lead to confusion about what’s being done, since this isn’t a commonly-used idiom. I know it would have the potential to confuse me.
Additonally, if you change the value of KEY as follows (but miss changing d.spam), you now get:
>>> KEY = 'foo'
>>> d[KEY] = 1
>>> # Several lines of miscellaneous code here...
... assert d.spam == 1
Traceback (most recent call last):
  File "<stdin>", line 2, in <module>
AttributeError: 'C' object has no attribute 'spam'
IMO, not worth the effort.
Other Items
As others have noted, you can use any hashable object (not just a string) as a dict key. For example,
>>> d = {(2, 3): True,}
>>> assert d[(2, 3)] is True
>>>
is legal, but
>>> C = type('C', (object,), {(2, 3): True})
>>> d = C()
>>> assert d.(2, 3) is True
  File "<stdin>", line 1
  d.(2, 3)
    ^
SyntaxError: invalid syntax
>>> getattr(d, (2, 3))
Traceback (most recent call last):
  File "<stdin>", line 1, in <module>
TypeError: getattr(): attribute name must be string
>>>
is not. This gives you access to the entire range of printable characters or other hashable objects for your dictionary keys, which you do not have when accessing an object attribute. This makes possible such magic as a cached object metaclass, like the recipe from the Python Cookbook (Ch. 9).
Wherein I Editorialize
I prefer the aesthetics of spam.eggs over spam['eggs'] (I think it looks cleaner), and I really started craving this functionality when I met the namedtuple. But the convenience of being able to do the following trumps it.
>>> KEYS = 'spam eggs ham'
>>> VALS = [1, 2, 3]
>>> d = {k: v for k, v in zip(KEYS.split(' '), VALS)}
>>> assert d == {'spam': 1, 'eggs': 2, 'ham': 3}
>>>
This is a simple example, but I frequently find myself using dicts in different situations than I’d use obj.key notation (i.e., when I need to read prefs in from an XML file). In other cases, where I’m tempted to instantiate a dynamic class and slap some attributes on it for aesthetic reasons, I continue to use a dict for consistency in order to enhance readability.
I’m sure the OP has long-since resolved this to his satisfaction, but if he still wants this functionality, then I suggest he download one of the packages from pypi that provides it:
Bunch is the one I’m more familiar with. Subclass of dict, so you have all that functionality.AttrDict also looks like it’s also pretty good, but I’m not as familiar with it and haven’t looked through the source in as much detail as I have Bunch.- Addict Is actively maintained and provides attr-like access and more.
- As noted in the comments by Rotareti, Bunch has been deprecated, but there is an active fork called Munch.
However, in order to improve readability of his code I strongly recommend that he not mix his notation styles. If he prefers this notation then he should simply instantiate a dynamic object, add his desired attributes to it, and call it a day:
>>> C = type('C', (object,), {})
>>> d = C()
>>> d.spam = 1
>>> d.eggs = 2
>>> d.ham = 3
>>> assert d.__dict__ == {'spam': 1, 'eggs': 2, 'ham': 3}
Wherein I Update, to Answer a Follow-Up Question in the Comments
In the comments (below), Elmo asks:
What if you want to go one deeper? ( referring to type(…) )
While I’ve never used this use case (again, I tend to use nested dict, for
consistency), the following code works:
>>> C = type('C', (object,), {})
>>> d = C()
>>> for x in 'spam eggs ham'.split():
...     setattr(d, x, C())
...     i = 1
...     for y in 'one two three'.split():
...         setattr(getattr(d, x), y, i)
...         i += 1
...
>>> assert d.spam.__dict__ == {'one': 1, 'two': 2, 'three': 3}
回答 4
回答 5
您可以从标准库中提取一个方便的容器类:
from argparse import Namespace
避免必须复制代码位。没有标准的字典访问权限,但是如果您真的想要的话,很容易找回。argparse中的代码很简单,
class Namespace(_AttributeHolder):
    """Simple object for storing attributes.

    Implements equality by attribute names and values, and provides a simple
    string representation.
    """

    def __init__(self, **kwargs):
        for name in kwargs:
            setattr(self, name, kwargs[name])

    __hash__ = None

    def __eq__(self, other):
        return vars(self) == vars(other)

    def __ne__(self, other):
        return not (self == other)

    def __contains__(self, key):
        return key in self.__dict__
You can pull a convenient container class from the standard library:
from argparse import Namespace
to avoid having to copy around code bits. No standard dictionary access, but easy to get one back if you really want it. The code in argparse is simple,
class Namespace(_AttributeHolder):
    """Simple object for storing attributes.

    Implements equality by attribute names and values, and provides a simple
    string representation.
    """

    def __init__(self, **kwargs):
        for name in kwargs:
            setattr(self, name, kwargs[name])

    __hash__ = None

    def __eq__(self, other):
        return vars(self) == vars(other)

    def __ne__(self, other):
        return not (self == other)

    def __contains__(self, key):
        return key in self.__dict__
回答 6
如果您想要一个作为方法的键,例如__eq__或,该__getattr__怎么办?
而且,您将无法输入不以字母开头的条目,因此无法0343853用作键。
如果不想使用字符串怎么办?
What if you wanted a key which was a method, such as __eq__ or __getattr__?
And you wouldn’t be able to have an entry that didn’t start with a letter, so using 0343853 as a key is out.
And what if you didn’t want to use a string?
回答 7
元组可以使用dict键。您将如何访问构造中的元组?
同样,namedtuple是一种方便的结构,可以通过属性访问提供值。
tuples can be used dict keys. How would you access tuple in your construct?
Also, namedtuple is a convenient structure which can provide values via the attribute access.
回答 8
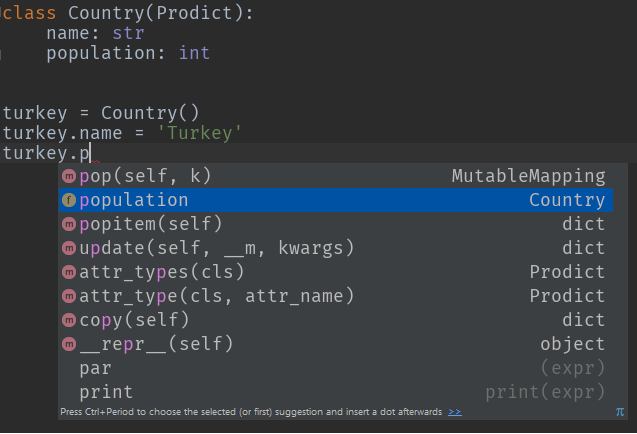
怎么样Prodict,我写来统治它们的小Python类:)
另外,您将获得自动代码完成,递归对象实例化和自动类型转换!
您可以完全按照要求进行:
p = Prodict()
p.foo = 1
p.bar = "baz"
示例1:类型提示
class Country(Prodict):
    name: str
    population: int

turkey = Country()
turkey.name = 'Turkey'
turkey.population = 79814871
示例2:自动类型转换
germany = Country(name='Germany', population='82175700', flag_colors=['black', 'red', 'yellow'])

print(germany.population)  # 82175700
print(type(germany.population))  # <class 'int'>

print(germany.flag_colors)  # ['black', 'red', 'yellow']
print(type(germany.flag_colors))  # <class 'list'>
How about Prodict, the little Python class that I wrote to rule them all:)
Plus, you get auto code completion, recursive object instantiations and auto type conversion!
You can do exactly what you asked for:
p = Prodict()
p.foo = 1
p.bar = "baz"
Example 1: Type hinting
class Country(Prodict):
    name: str
    population: int

turkey = Country()
turkey.name = 'Turkey'
turkey.population = 79814871
Example 2: Auto type conversion
germany = Country(name='Germany', population='82175700', flag_colors=['black', 'red', 'yellow'])

print(germany.population)  # 82175700
print(type(germany.population))  # <class 'int'>

print(germany.flag_colors)  # ['black', 'red', 'yellow']
print(type(germany.flag_colors))  # <class 'list'>
回答 9
一般而言,它不起作用。并非所有有效的dict键都具有可寻址属性(“键”)。因此,您需要小心。
Python对象基本上都是字典。因此,我怀疑会有很多性能或其他损失。
It doesn’t work in generality. Not all valid dict keys make addressable attributes (“the key”). So, you’ll need to be careful.
Python objects are all basically dictionaries. So I doubt there is much performance or other penalty.
回答 10
这并没有解决最初的问题,但是对于像我这样在寻找提供此功能的库时到此结束的人很有用。
冰火它是为这个伟大的lib:https://github.com/mewwts/addict需要在前面的答案中提到的许多问题护理。
来自文档的示例:
body = {
    'query': {
        'filtered': {
            'query': {
                'match': {'description': 'addictive'}
            },
            'filter': {
                'term': {'created_by': 'Mats'}
            }
        }
    }
}
与瘾君子:
from addict import Dict
body = Dict()
body.query.filtered.query.match.description = 'addictive'
body.query.filtered.filter.term.created_by = 'Mats'
This doesn’t address the original question, but should be useful for people that, like me, end up here when looking for a lib that provides this functionality.
Addict it’s a great lib for this: https://github.com/mewwts/addict it takes care of many concerns mentioned in previous answers.
An example from the docs:
body = {
    'query': {
        'filtered': {
            'query': {
                'match': {'description': 'addictive'}
            },
            'filter': {
                'term': {'created_by': 'Mats'}
            }
        }
    }
}
With addict:
from addict import Dict
body = Dict()
body.query.filtered.query.match.description = 'addictive'
body.query.filtered.filter.term.created_by = 'Mats'
回答 11
我发现自己想知道python生态系统中“ dict keys as attr”的当前状态是什么。正如一些评论者所指出的那样,这可能不是您想要从头开始的事情,因为存在一些陷阱和脚枪,其中一些非常隐蔽。另外,我不建议将其Namespace用作基类,因为我一直走这条路,这并不漂亮。
幸运的是,有几个提供此功能的开源软件包,准备点安装!不幸的是,有几个软件包。简介,截至2019年12月。
竞争者(最近提交给master | #commits | #contribs | coverage%):
- 瘾君子 (2019-04-28 | 217 | 22 | 100%)
- 蒙克(2019年12月16日| 160 | 17 |?%)
- easydict(2018-10-18 | 51 | 6 |?%)
- attrdict(2019-02-01 | 108 | 5 | 100%)
- prodict (2019年10月1日| 65 | 1 |?%)
不再维护或维护不足:
- treedict(2014-03-28 | 95 | 2 |?%)
- 一堆(2012-03-12 | 20 | 2 |?%)
- NeoBunch
我目前建议吃午饭或上瘾。他们拥有最多的提交,贡献者和发布,建议为每个构建一个健康的开源代码库。它们具有最干净的readme.md,100%的覆盖率和良好的测试集。
除了滚动我自己的dict / attr代码并浪费大量时间,因为我不知道所有这些选择之外,我在这场比赛中没有一只狗(到目前为止!)。将来我可能会为瘾君子/饥饿做贡献,因为我宁愿看到一个坚固的包装,也不愿看到一堆零散的包装。如果您喜欢它们,请贡献力量!特别是,看起来像munch可以使用codecov徽章,而上瘾者可以使用python版本的徽章。
瘾君子的优点:
- 递归初始化(foo.abc =’bar’),类似dict的参数会上瘾。
瘾君子的缺点:
- 阴影,
typing.Dict如果你from addict import Dict
- 没有密钥检查。由于允许递归初始化,因此如果您拼写错误的键,则只需创建一个新属性,而不是KeyError(感谢AljoSt)
嚼劲:
- 独特的命名
- JSON和YAML的内置ser / de函数
缺点:
我在其中编辑
许多月前,当我使用文本编辑器在只有我自己或另一个开发人员的项目上编写python时,我喜欢dict-attrs的样式,即只需声明即可插入键foo.bar.spam = eggs。现在,我在团队中工作,并使用IDE进行所有操作,而我通常已经从这类数据结构和动态类型中移开了,而转向了静态分析,功能技术和类型提示。我已经开始尝试这种技术,并使用我自己设计的对象将Pstruct子类化:
class  BasePstruct(dict):
    def __getattr__(self, name):
        if name in self.__slots__:
            return self[name]
        return self.__getattribute__(name)

    def __setattr__(self, key, value):
        if key in self.__slots__:
            self[key] = value
            return
        if key in type(self).__dict__:
            self[key] = value
            return
        raise AttributeError(
            "type object '{}' has no attribute '{}'".format(type(self).__name__, key))


class FooPstruct(BasePstruct):
    __slots__ = ['foo', 'bar']
这为您提供了一个对象,其行为仍然像dict,但还使您可以更严格的方式访问诸如属性之类的键。这样做的好处是我(或代码的不幸使用者)确切知道哪些字段可以存在和不存在,并且IDE可以自动完成字段。子类化香草也dict意味着json序列化很容易。我认为这种想法的下一个发展将是一个自定义的protobuf生成器,它会发出这些接口,并且一个不错的替代方法是,您几乎可以免费通过gRPC获得跨语言的数据结构和IPC。
如果您决定采用attr-dict,则必须记录下期望的字段,以确保您自己(以及队友)的理智。
随时编辑/更新此帖子以保持最新!
I found myself wondering what the current state of “dict keys as attr” in the python ecosystem. As several commenters have pointed out, this is probably not something you want to roll your own from scratch, as there are several pitfalls and footguns, some of them very subtle. Also, I would not recommend using Namespace as a base class, I’ve been down that road, it isn’t pretty.
Fortunately, there are several open source packages providing this functionality, ready to pip install! Unfortunately, there are several packages. Here is a synopsis, as of Dec 2019.
Contenders (most recent commit to master|#commits|#contribs|coverage%):
- addict (2019-04-28 | 217 | 22 | 100%)
- munch (2019-12-16 | 160 | 17 | ?%)
- easydict (2018-10-18 | 51 | 6 | ?%)
- attrdict (2019-02-01 | 108 | 5 | 100%)
- prodict (2019-10-01 | 65 | 1 | ?%)
No longer maintained or under-maintained:
- treedict (2014-03-28 | 95 | 2 | ?%)
- bunch (2012-03-12 | 20 | 2 | ?%)
- NeoBunch
I currently recommend munch or addict. They have the most commits, contributors, and releases, suggesting a healthy open-source codebase for each. They have the cleanest-looking readme.md, 100% coverage, and good looking set of tests.
I do not have a dog in this race (for now!), besides having rolled my own dict/attr code and wasted a ton of time because I was not aware of all these options :). I may contribute to addict/munch in the future as I would rather see one solid package than a bunch of fragmented ones. If you like them, contribute! In particular, looks like munch could use a codecov badge and addict could use a python version badge.
addict pros:
- recursive initialization (foo.a.b.c = ‘bar’), dict-like arguments become addict.Dict
addict cons:
- shadows
typing.Dict if you from addict import Dict
- No key checking. Due to allowing recursive init, if you misspell a key, you just create a new attribute, rather than KeyError (thanks AljoSt)
munch pros:
- unique naming
- built-in ser/de functions for JSON and YAML
munch cons:
- no recursive init / only can init one attr at a time
Wherein I Editorialize
Many moons ago, when I used text editors to write python, on projects with only myself or one other dev, I liked the style of dict-attrs, the ability to insert keys by just declaring foo.bar.spam = eggs. Now I work on teams, and use an IDE for everything, and I have drifted away from these sorts of data structures and dynamic typing in general, in favor of static analysis, functional techniques and type hints. I’ve started experimenting with this technique, subclassing Pstruct with objects of my own design:
class  BasePstruct(dict):
    def __getattr__(self, name):
        if name in self.__slots__:
            return self[name]
        return self.__getattribute__(name)

    def __setattr__(self, key, value):
        if key in self.__slots__:
            self[key] = value
            return
        if key in type(self).__dict__:
            self[key] = value
            return
        raise AttributeError(
            "type object '{}' has no attribute '{}'".format(type(self).__name__, key))


class FooPstruct(BasePstruct):
    __slots__ = ['foo', 'bar']
This gives you an object which still behaves like a dict, but also lets you access keys like attributes, in a much more rigid fashion. The advantage here is I (or the hapless consumers of your code) know exactly what fields can and can’t exist, and the IDE can autocomplete fields. Also subclassing vanilla dict means json serialization is easy. I think the next evolution in this idea would be a custom protobuf generator which emits these interfaces, and a nice knock-on is you get cross-language data structures and IPC via gRPC for nearly free.
If you do decide to go with attr-dicts, it’s essential to document what fields are expected, for your own (and your teammates’) sanity.
Feel free to edit/update this post to keep it recent!
回答 12
这是使用内置的不可变记录的简短示例collections.namedtuple:
def record(name, d):
    return namedtuple(name, d.keys())(**d)
和用法示例:
rec = record('Model', {
    'train_op': train_op,
    'loss': loss,
})

print rec.loss(..)
Here’s a short example of immutable records using built-in collections.namedtuple:
def record(name, d):
    return namedtuple(name, d.keys())(**d)
and a usage example:
rec = record('Model', {
    'train_op': train_op,
    'loss': loss,
})

print rec.loss(..)
回答 13
只是为了增加答案的多样性,sci-kit learning已将其实现为Bunch:
class Bunch(dict):
    """ Scikit Learn's container object

    Dictionary-like object that exposes its keys as attributes.
    >>> b = Bunch(a=1, b=2)
    >>> b['b']
    2
    >>> b.b
    2
    >>> b.c = 6
    >>> b['c']
    6
    """

    def __init__(self, **kwargs):
        super(Bunch, self).__init__(kwargs)

    def __setattr__(self, key, value):
        self[key] = value

    def __dir__(self):
        return self.keys()

    def __getattr__(self, key):
        try:
            return self[key]
        except KeyError:
            raise AttributeError(key)

    def __setstate__(self, state):
        pass
您所需要做的就是获取setattr和getattr方法- getattr检查dict键,然后继续检查实际属性。这setstaet是用于酸洗/解开“束”的修复程序-如果您感兴趣,请查看https://github.com/scikit-learn/scikit-learn/issues/6196
Just to add some variety to the answer, sci-kit learn has this implemented as a Bunch:
class Bunch(dict):
    """ Scikit Learn's container object

    Dictionary-like object that exposes its keys as attributes.
    >>> b = Bunch(a=1, b=2)
    >>> b['b']
    2
    >>> b.b
    2
    >>> b.c = 6
    >>> b['c']
    6
    """

    def __init__(self, **kwargs):
        super(Bunch, self).__init__(kwargs)

    def __setattr__(self, key, value):
        self[key] = value

    def __dir__(self):
        return self.keys()

    def __getattr__(self, key):
        try:
            return self[key]
        except KeyError:
            raise AttributeError(key)

    def __setstate__(self, state):
        pass
All you need is to get the setattr and getattr methods – the getattr checks for dict keys and the moves on to checking for actual attributes. The setstaet is a fix for fix for pickling/unpickling “bunches” – if inerested check https://github.com/scikit-learn/scikit-learn/issues/6196
回答 14
无需编写自己的
setattr()和getattr()即可。
类对象的优势可能在类定义和继承中发挥了作用。
No need to write your own as
setattr() and getattr() already exist.
The advantage of class objects probably comes into play in class definition and inheritance.
回答 15
我是根据该线程的输入创建的。不过,我需要使用odict,因此必须重写get和set attr。我认为这应适用于大多数特殊用途。
用法如下所示:
# Create an ordered dict normally...
>>> od = OrderedAttrDict()
>>> od["a"] = 1
>>> od["b"] = 2
>>> od
OrderedAttrDict([('a', 1), ('b', 2)])

# Get and set data using attribute access...
>>> od.a
1
>>> od.b = 20
>>> od
OrderedAttrDict([('a', 1), ('b', 20)])

# Setting a NEW attribute only creates it on the instance, not the dict...
>>> od.c = 8
>>> od
OrderedAttrDict([('a', 1), ('b', 20)])
>>> od.c
8
Class:
class OrderedAttrDict(odict.OrderedDict):
    """
    Constructs an odict.OrderedDict with attribute access to data.

    Setting a NEW attribute only creates it on the instance, not the dict.
    Setting an attribute that is a key in the data will set the dict data but
    will not create a new instance attribute
    """
    def __getattr__(self, attr):
        """
        Try to get the data. If attr is not a key, fall-back and get the attr
        """
        if self.has_key(attr):
            return super(OrderedAttrDict, self).__getitem__(attr)
        else:
            return super(OrderedAttrDict, self).__getattr__(attr)


    def __setattr__(self, attr, value):
        """
        Try to set the data. If attr is not a key, fall-back and set the attr
        """
        if self.has_key(attr):
            super(OrderedAttrDict, self).__setitem__(attr, value)
        else:
            super(OrderedAttrDict, self).__setattr__(attr, value)
这是线程中已经提到的非常酷的模式,但是如果您只想接受一个dict并将其转换为可以在IDE中自动完成的对象,等等:
class ObjectFromDict(object):
    def __init__(self, d):
        self.__dict__ = d
I created this based on the input from this thread. I need to use odict though, so I had to override get and set attr. I think this should work for the majority of special uses.
Usage looks like this:
# Create an ordered dict normally...
>>> od = OrderedAttrDict()
>>> od["a"] = 1
>>> od["b"] = 2
>>> od
OrderedAttrDict([('a', 1), ('b', 2)])

# Get and set data using attribute access...
>>> od.a
1
>>> od.b = 20
>>> od
OrderedAttrDict([('a', 1), ('b', 20)])

# Setting a NEW attribute only creates it on the instance, not the dict...
>>> od.c = 8
>>> od
OrderedAttrDict([('a', 1), ('b', 20)])
>>> od.c
8
The class:
class OrderedAttrDict(odict.OrderedDict):
    """
    Constructs an odict.OrderedDict with attribute access to data.

    Setting a NEW attribute only creates it on the instance, not the dict.
    Setting an attribute that is a key in the data will set the dict data but
    will not create a new instance attribute
    """
    def __getattr__(self, attr):
        """
        Try to get the data. If attr is not a key, fall-back and get the attr
        """
        if self.has_key(attr):
            return super(OrderedAttrDict, self).__getitem__(attr)
        else:
            return super(OrderedAttrDict, self).__getattr__(attr)


    def __setattr__(self, attr, value):
        """
        Try to set the data. If attr is not a key, fall-back and set the attr
        """
        if self.has_key(attr):
            super(OrderedAttrDict, self).__setitem__(attr, value)
        else:
            super(OrderedAttrDict, self).__setattr__(attr, value)
This is a pretty cool pattern already mentioned in the thread, but if you just want to take a dict and convert it to an object that works with auto-complete in an IDE, etc:
class ObjectFromDict(object):
    def __init__(self, d):
        self.__dict__ = d
回答 16
Apparently there is now a library for this – https://pypi.python.org/pypi/attrdict – which implements this exact functionality plus recursive merging and json loading. Might be worth a look.
回答 17
这就是我用的
args = {
        'batch_size': 32,
        'workers': 4,
        'train_dir': 'train',
        'val_dir': 'val',
        'lr': 1e-3,
        'momentum': 0.9,
        'weight_decay': 1e-4
    }
args = namedtuple('Args', ' '.join(list(args.keys())))(**args)

print (args.lr)
This is what I use
args = {
        'batch_size': 32,
        'workers': 4,
        'train_dir': 'train',
        'val_dir': 'val',
        'lr': 1e-3,
        'momentum': 0.9,
        'weight_decay': 1e-4
    }
args = namedtuple('Args', ' '.join(list(args.keys())))(**args)

print (args.lr)
回答 18
您可以使用我刚刚制作的此类来做。通过此类,您可以Map像其他字典(包括json序列化)一样使用该对象,也可以使用点符号。希望对您有帮助:
class Map(dict):
    """
    Example:
    m = Map({'first_name': 'Eduardo'}, last_name='Pool', age=24, sports=['Soccer'])
    """
    def __init__(self, *args, **kwargs):
        super(Map, self).__init__(*args, **kwargs)
        for arg in args:
            if isinstance(arg, dict):
                for k, v in arg.iteritems():
                    self[k] = v

        if kwargs:
            for k, v in kwargs.iteritems():
                self[k] = v

    def __getattr__(self, attr):
        return self.get(attr)

    def __setattr__(self, key, value):
        self.__setitem__(key, value)

    def __setitem__(self, key, value):
        super(Map, self).__setitem__(key, value)
        self.__dict__.update({key: value})

    def __delattr__(self, item):
        self.__delitem__(item)

    def __delitem__(self, key):
        super(Map, self).__delitem__(key)
        del self.__dict__[key]
用法示例:
m = Map({'first_name': 'Eduardo'}, last_name='Pool', age=24, sports=['Soccer'])
# Add new key
m.new_key = 'Hello world!'
print m.new_key
print m['new_key']
# Update values
m.new_key = 'Yay!'
# Or
m['new_key'] = 'Yay!'
# Delete key
del m.new_key
# Or
del m['new_key']
You can do it using this class I just made. With this class you can use the Map object like another dictionary(including json serialization) or with the dot notation. I hope help you:
class Map(dict):
    """
    Example:
    m = Map({'first_name': 'Eduardo'}, last_name='Pool', age=24, sports=['Soccer'])
    """
    def __init__(self, *args, **kwargs):
        super(Map, self).__init__(*args, **kwargs)
        for arg in args:
            if isinstance(arg, dict):
                for k, v in arg.iteritems():
                    self[k] = v

        if kwargs:
            for k, v in kwargs.iteritems():
                self[k] = v

    def __getattr__(self, attr):
        return self.get(attr)

    def __setattr__(self, key, value):
        self.__setitem__(key, value)

    def __setitem__(self, key, value):
        super(Map, self).__setitem__(key, value)
        self.__dict__.update({key: value})

    def __delattr__(self, item):
        self.__delitem__(item)

    def __delitem__(self, key):
        super(Map, self).__delitem__(key)
        del self.__dict__[key]
Usage examples:
m = Map({'first_name': 'Eduardo'}, last_name='Pool', age=24, sports=['Soccer'])
# Add new key
m.new_key = 'Hello world!'
print m.new_key
print m['new_key']
# Update values
m.new_key = 'Yay!'
# Or
m['new_key'] = 'Yay!'
# Delete key
del m.new_key
# Or
del m['new_key']
回答 19
让我发布另一个实现,该实现基于Kinvais的答案,但整合了http://databio.org/posts/python_AttributeDict.html中提出的AttributeDict的思想。
这个版本的优点是它也适用于嵌套字典:
class AttrDict(dict):
    """
    A class to convert a nested Dictionary into an object with key-values
    that are accessible using attribute notation (AttrDict.attribute) instead of
    key notation (Dict["key"]). This class recursively sets Dicts to objects,
    allowing you to recurse down nested dicts (like: AttrDict.attr.attr)
    """

    # Inspired by:
    # http://stackoverflow.com/a/14620633/1551810
    # http://databio.org/posts/python_AttributeDict.html

    def __init__(self, iterable, **kwargs):
        super(AttrDict, self).__init__(iterable, **kwargs)
        for key, value in iterable.items():
            if isinstance(value, dict):
                self.__dict__[key] = AttrDict(value)
            else:
                self.__dict__[key] = value
Let me post another implementation, which builds upon the answer of Kinvais, but integrates ideas from the AttributeDict proposed in http://databio.org/posts/python_AttributeDict.html.
The advantage of this version is that it also works for nested dictionaries:
class AttrDict(dict):
    """
    A class to convert a nested Dictionary into an object with key-values
    that are accessible using attribute notation (AttrDict.attribute) instead of
    key notation (Dict["key"]). This class recursively sets Dicts to objects,
    allowing you to recurse down nested dicts (like: AttrDict.attr.attr)
    """

    # Inspired by:
    # http://stackoverflow.com/a/14620633/1551810
    # http://databio.org/posts/python_AttributeDict.html

    def __init__(self, iterable, **kwargs):
        super(AttrDict, self).__init__(iterable, **kwargs)
        for key, value in iterable.items():
            if isinstance(value, dict):
                self.__dict__[key] = AttrDict(value)
            else:
                self.__dict__[key] = value
回答 20
class AttrDict(dict):

     def __init__(self):
           self.__dict__ = self

if __name__ == '____main__':

     d = AttrDict()
     d['ray'] = 'hope'
     d.sun = 'shine'  >>> Now we can use this . notation
     print d['ray']
     print d.sun
class AttrDict(dict):

     def __init__(self):
           self.__dict__ = self

if __name__ == '____main__':

     d = AttrDict()
     d['ray'] = 'hope'
     d.sun = 'shine'  >>> Now we can use this . notation
     print d['ray']
     print d.sun
回答 21
解决方法是:
DICT_RESERVED_KEYS = vars(dict).keys()


class SmartDict(dict):
    """
    A Dict which is accessible via attribute dot notation
    """
    def __init__(self, *args, **kwargs):
        """
        :param args: multiple dicts ({}, {}, ..)
        :param kwargs: arbitrary keys='value'

        If ``keyerror=False`` is passed then not found attributes will
        always return None.
        """
        super(SmartDict, self).__init__()
        self['__keyerror'] = kwargs.pop('keyerror', True)
        [self.update(arg) for arg in args if isinstance(arg, dict)]
        self.update(kwargs)

    def __getattr__(self, attr):
        if attr not in DICT_RESERVED_KEYS:
            if self['__keyerror']:
                return self[attr]
            else:
                return self.get(attr)
        return getattr(self, attr)

    def __setattr__(self, key, value):
        if key in DICT_RESERVED_KEYS:
            raise AttributeError("You cannot set a reserved name as attribute")
        self.__setitem__(key, value)

    def __copy__(self):
        return self.__class__(self)

    def copy(self):
        return self.__copy__()
Solution is:
DICT_RESERVED_KEYS = vars(dict).keys()


class SmartDict(dict):
    """
    A Dict which is accessible via attribute dot notation
    """
    def __init__(self, *args, **kwargs):
        """
        :param args: multiple dicts ({}, {}, ..)
        :param kwargs: arbitrary keys='value'

        If ``keyerror=False`` is passed then not found attributes will
        always return None.
        """
        super(SmartDict, self).__init__()
        self['__keyerror'] = kwargs.pop('keyerror', True)
        [self.update(arg) for arg in args if isinstance(arg, dict)]
        self.update(kwargs)

    def __getattr__(self, attr):
        if attr not in DICT_RESERVED_KEYS:
            if self['__keyerror']:
                return self[attr]
            else:
                return self.get(attr)
        return getattr(self, attr)

    def __setattr__(self, key, value):
        if key in DICT_RESERVED_KEYS:
            raise AttributeError("You cannot set a reserved name as attribute")
        self.__setitem__(key, value)

    def __copy__(self):
        return self.__class__(self)

    def copy(self):
        return self.__copy__()
回答 22
以这种方式访问字典键的注意事项和陷阱是什么?
正如@Henry所建议的那样,可能无法在dict中使用点分访问的一个原因是它将dict关键字名限制为python有效变量,从而限制了所有可能的名称。
下面的示例说明了在给定命令的情况下,为什么点访问通常不会有用d:
有效期
以下属性在Python中无效:
d.1_foo                           # enumerated names
d./bar                            # path names
d.21.7, d.12:30                   # decimals, time
d.""                              # empty strings
d.john doe, d.denny's             # spaces, misc punctuation
d.3 * x                           # expressions
样式
PEP8约定将对属性命名施加软约束:
A.保留关键字(或内置函数)名称:
d.in
d.False, d.True
d.max, d.min
d.sum
d.id
如果函数参数的名称与保留关键字冲突,通常最好在其后附加一个下划线…
B.关于方法和变量名的大小写规则:
变量名遵循与函数名相同的约定。
d.Firstname
d.Country
使用函数命名规则:小写字母,单词以下划线分隔,以提高可读性。
有时候,像熊猫这样的图书馆会引起这些担忧,该允许按名称对DataFrame列进行点访问。解决命名限制的默认机制也是数组符号-方括号中的字符串。
如果这些约束不适用于您的用例,则点访问数据结构上有多个选项。
What would be the caveats and pitfalls of accessing dict keys in this manner?
As @Henry suggests, one reason dotted-access may not be used in dicts is that it limits dict key names to python-valid variables, thereby restricting all possible names.
The following are examples on why dotted-access would not be helpful in general, given a dict, d:
Validity
The following attributes would be invalid in Python:
d.1_foo                           # enumerated names
d./bar                            # path names
d.21.7, d.12:30                   # decimals, time
d.""                              # empty strings
d.john doe, d.denny's             # spaces, misc punctuation
d.3 * x                           # expressions
Style
PEP8 conventions would impose a soft constraint on attribute naming:
A. Reserved keyword (or builtin function) names:
d.in
d.False, d.True
d.max, d.min
d.sum
d.id
If a function argument’s name clashes with a reserved keyword, it is generally better to append a single trailing underscore …
B. The case rule on methods and variable names:
Variable names follow the same convention as function names.
d.Firstname
d.Country
Use the function naming rules: lowercase with words separated by underscores as necessary to improve readability.
Sometimes these concerns are raised in libraries like pandas, which permits dotted-access of DataFrame columns by name. The default mechanism to resolve naming restrictions is also array-notation – a string within brackets.
If these constraints do not apply to your use case, there are several options on dotted-access data structures.
回答 23
回答 24
这不是一个“好”答案,但我认为这很不错(它不能处理当前形式的嵌套字典。)只需将您的字典包装在一个函数中:
def make_funcdict(d=None, **kwargs)
    def funcdict(d=None, **kwargs):
        if d is not None:
            funcdict.__dict__.update(d)
        funcdict.__dict__.update(kwargs)
        return funcdict.__dict__
    funcdict(d, **kwargs)
    return funcdict
现在您的语法略有不同。要像属性一样访问字典项f.key。要以通常的方式访问dict项目(和其他dict方法)f()['key'],我们可以方便地通过使用关键字参数和/或字典调用f来更新dict
例
d = {'name':'Henry', 'age':31}
d = make_funcdict(d)
>>> for key in d():
...     print key
...
age
name
>>> print d.name
... Henry
>>> print d.age
... 31
>>> d({'Height':'5-11'}, Job='Carpenter')
... {'age': 31, 'name': 'Henry', 'Job': 'Carpenter', 'Height': '5-11'}
在那里。如果有人建议使用此方法的优点和缺点,我会很高兴。
This isn’t a ‘good’ answer, but I thought this was nifty (it doesn’t handle nested dicts in current form). Simply wrap your dict in a function:
def make_funcdict(d=None, **kwargs)
    def funcdict(d=None, **kwargs):
        if d is not None:
            funcdict.__dict__.update(d)
        funcdict.__dict__.update(kwargs)
        return funcdict.__dict__
    funcdict(d, **kwargs)
    return funcdict
Now you have slightly different syntax. To acces the dict items as attributes do f.key. To access the dict items (and other dict methods) in the usual manner do f()['key'] and we can conveniently update the dict by calling f with keyword arguments and/or a dictionary
Example
d = {'name':'Henry', 'age':31}
d = make_funcdict(d)
>>> for key in d():
...     print key
...
age
name
>>> print d.name
... Henry
>>> print d.age
... 31
>>> d({'Height':'5-11'}, Job='Carpenter')
... {'age': 31, 'name': 'Henry', 'Job': 'Carpenter', 'Height': '5-11'}
And there it is. I’ll be happy if anyone suggests benefits and drawbacks of this method.
回答 25
正如Doug指出的那样,有一个Bunch软件包可用于实现该obj.key功能。其实有一个较新的版本叫做
NeoBunch
它具有很大的功能,可以通过它的neobunchify函数将您的字典转换为NeoBunch对象。我经常使用Mako模板,并且由于NeoBunch对象传递数据使它们更具可读性,因此,如果您碰巧最终在Python程序中使用了普通字典,但是想要在Mako模板中使用点符号,则可以这样使用:
from mako.template import Template
from neobunch import neobunchify

mako_template = Template(filename='mako.tmpl', strict_undefined=True)
data = {'tmpl_data': [{'key1': 'value1', 'key2': 'value2'}]}
with open('out.txt', 'w') as out_file:
    out_file.write(mako_template.render(**neobunchify(data)))
Mako模板可能如下所示:
% for d in tmpl_data:
Column1     Column2
${d.key1}   ${d.key2}
% endfor
As noted by Doug there’s a Bunch package which you can use to achieve the obj.key functionality. Actually there’s a newer version called
NeoBunch
It has though a great feature converting your dict to a NeoBunch object through its neobunchify function. I use Mako templates a lot and passing data as NeoBunch objects makes them far more readable, so if you happen to end up using a normal dict in your Python program but want the dot notation in a Mako template you can use it that way:
from mako.template import Template
from neobunch import neobunchify

mako_template = Template(filename='mako.tmpl', strict_undefined=True)
data = {'tmpl_data': [{'key1': 'value1', 'key2': 'value2'}]}
with open('out.txt', 'w') as out_file:
    out_file.write(mako_template.render(**neobunchify(data)))
And the Mako template could look like:
% for d in tmpl_data:
Column1     Column2
${d.key1}   ${d.key2}
% endfor
回答 26
最简单的方法是定义一个类,我们将其称为命名空间。它在字典上使用对象dict .update()。然后,该字典将被视为对象。
class Namespace(object):
    '''
    helps referencing object in a dictionary as dict.key instead of dict['key']
    '''
    def __init__(self, adict):
        self.__dict__.update(adict)


Person = Namespace({'name': 'ahmed',
                     'age': 30}) #--> added for edge_cls


print(Person.name)
The easiest way is to define a class let’s call it Namespace. which uses the object dict.update() on the dict. Then, the dict will be treated as an object.
class Namespace(object):
    '''
    helps referencing object in a dictionary as dict.key instead of dict['key']
    '''
    def __init__(self, adict):
        self.__dict__.update(adict)


Person = Namespace({'name': 'ahmed',
                     'age': 30}) #--> added for edge_cls


print(Person.name)